Deploy with SAP BTP Kyma Runtime
The following documentation is a guide for installing OmniSpatial in SAP's BTP Kyma Runtime environment. The guide will walk you through each step of deploying the OmniSpatial dependency components and then the OmniSpatial containers themselves.
Deployment Prerequisites
Platform Requirements
The following platform/components must be available and accessible.
- SAP BTP Access
- An SAP sub-account with BTP Kyma Runtime Entitlement enabled
Local Environment Tools
The following tools are required to be installed and available to the person performing the deployment steps.
- Kubernetes CLI (kubectl)
- Used to interact with the Kubernetes API.
- Kubernetes Package Manager CLI (HELM)
- Used to deploy the OmniSpatial HELM charts.
- A registry YAML file provided by Rizing
- This file will provide access to Rizing's container registry (will be used later in the deployment steps).
Deployment Overview
Following this guide will produce a complete OmniSpatial technology stack deployed within SAP's BTP Kyma Runtime environment. The deployment will result in the following general High-Availability (HA) components:
keycloaknamespace- Keycloak Cluster - used as an identity broker to provide Single-Sign on (SSO)
- Postgres Database Cluster - used to store Keycloak application data
omninamespace- Postgres Database Cluster - used to store OmniSpatial application data
- OmniSpatial frontend (application) deployment
- OmniSpatial backend (REST API services) deployment
- OmniSpatial documentation (User Guide) deployment
Install Postgres Database Operator
Install the CloudNative PG Operator.
- Add the HELM repository
helm repo add cnpg https://cloudnative-pg.github.io/charts
- Install the operator
helm upgrade --install cnpg --namespace cnpg-system --create-namespace cnpg/cloudnative-pg --wait
Install Keycloak
Keycloak is an open source identity and access management solution which is used in Omni to provide Single-Sign on capabilities. Reference docs can be found here.
Install Keycloak Operator
- Create
keycloaknamespace
kubectl create namespace keycloak
- Deploy the Keycloak Custom Resource Definitions (CRDs):
kubectl apply -f https://raw.githubusercontent.com/keycloak/keycloak-k8s-resources/22.0.1/kubernetes/keycloaks.k8s.keycloak.org-v1.yml
kubectl apply -f https://raw.githubusercontent.com/keycloak/keycloak-k8s-resources/22.0.1/kubernetes/keycloakrealmimports.k8s.keycloak.org-v1.yml
- Deploy the Keycloak Operator deployment:
kubectl apply -n keycloak -f https://raw.githubusercontent.com/keycloak/keycloak-k8s-resources/22.0.1/kubernetes/kubernetes.yml
Deploy Postgres Database for Keycloak
Keycloak requires a database to store its information. The following steps will guide you through installing a Postgres Cluster for Keycloak.
- Create
keycloak-postgres-cluster.yamlfile
apiVersion: postgresql.cnpg.io/v1
kind: Cluster
metadata:
  name: postgres
  namespace: keycloak
spec:
  instances: 3
  storage:
    size: 25Gi
  bootstrap:
    initdb:
      database: keycloak
      owner: keycloak
  monitoring:
    enablePodMonitor: true
- Apply file
kubectl apply -f ./keycloak-postgres-cluster.yaml
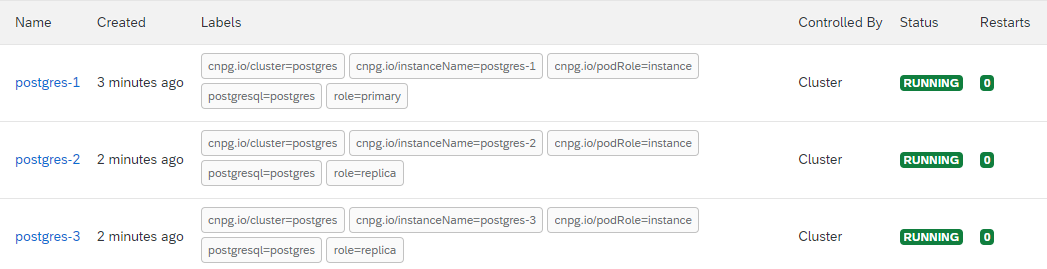
- Wait for cluster to finish creating.
There should be "n" number of Postgres pods that get created, where "n" is the number of instances defined in the YAML file. For Example, if 3 instances were specified, you will need to wait for 3 postgres-n pods to have a "Running" status:
Create Keycloak Cluster
- Create
keycloak-cluster.yamlfile
Update the YOUR_DOMAIN.com with the domain of the BTP cluster (ex: identity.c-2d7e2a3.kyma.ondemand.com).
apiVersion: k8s.keycloak.org/v2alpha1
kind: Keycloak
metadata:
  name: keycloak
  namespace: keycloak
spec:
  instances: 3
  db:
    vendor: postgres
    usernameSecret:
      name: postgres-app
      key: username
    passwordSecret:
      name: postgres-app
      key: password
    host: postgres-rw.keycloak.svc
    database: keycloak
  hostname:
    hostname: identity.YOUR_DOMAIN.com # <--- UPDATE
  additionalOptions:
    - name: proxy
      value: edge
- Apply file
kubectl apply -f ./keycloak-cluster.yaml
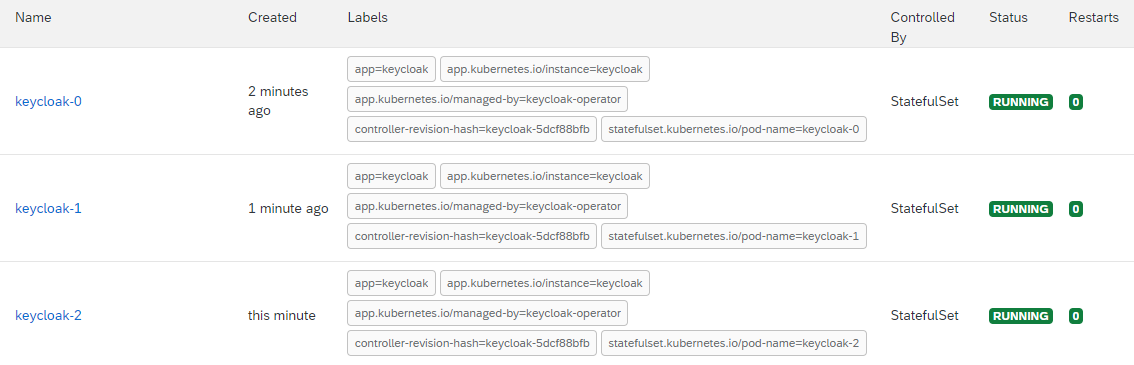
- Wait for each pod for every instance of the cluster to become available:
There should be "n" number of Keycloak pods that get created, where "n" is the number of instances defined in the YAML file. For Example, if 3 instances were specified, you will need to wait for 3 keycloak-n pods to have a "Running" status:
Expose Keycloak
- Create
keycloak-api-rule.yamlfile
Update the YOUR_DOMAIN.com with the domain of the BTP cluster (ex: identity.c-2d7e2a3.kyma.ondemand.com).
apiVersion: gateway.kyma-project.io/v1beta1
kind: APIRule
metadata:
  name: keycloak
  namespace: keycloak
spec:
  gateway: kyma-gateway.kyma-system.svc.cluster.local
  host: identity.YOUR_DOMAIN.com # <--- UPDATE
  rules:
    - accessStrategies:
        - handler: allow
      methods:
        - GET
        - POST
        - PUT
        - DELETE
        - PATCH
        - HEAD
      path: /.*
      service:
        name: keycloak-service
        port: 8080
  service:
    name: keycloak-service
    port: 8080
- Apply file
kubectl apply -f ./keycloak-api-rule.yaml
Install Omni
The OmniSpatial application is made up of 3 containerized apps.
omni- the frontend applicationomni-api- the backend REST servicesomni-docs- the User Guide and documentation for the application
- Create
omninamespace
kubectl create namespace omni
Deploy Postgres Database for Omni
Omni requires a database to store application data. The following steps will guide you through installing a Postgres Cluster for Omni.
- Create
omni-postgres-cluster.yamlfile
apiVersion: postgresql.cnpg.io/v1
kind: Cluster
metadata:
  name: postgres
  namespace: omni
spec:
  instances: 3
  storage:
    size: 25Gi
  bootstrap:
    initdb:
      database: omni
      owner: omni
  monitoring:
    enablePodMonitor: true
- Apply file
kubectl apply -f ./omni-postgres-cluster.yaml
- Wait for cluster to finish creating.
There should be "n" number of Postgres pods that get created, where "n" is the number of instances defined in the YAML file. For Example, if 3 instances were specified, you will need to wait for 3 postgres-n pods to have a "Running" status:
Deploy Omni Workloads
- Add Rizing container registry secret
NOTE: You should receive this file from Rizing.
kubectl apply -f rizing-registry.yaml -n omni
- Get keycloak admin password
Retrieve and copy the decoded password value from the the keycloak-initial-admin secret.
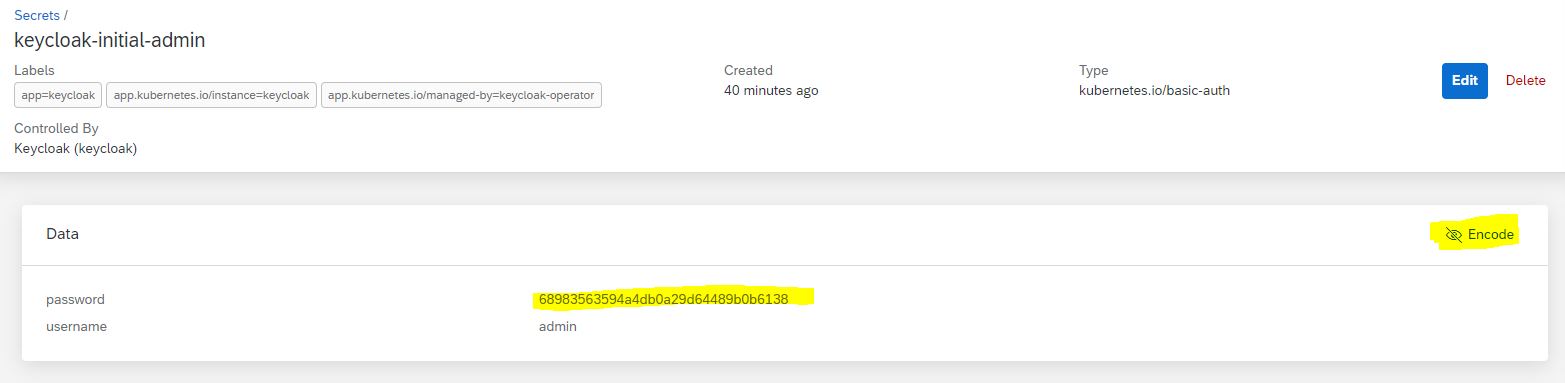
Optionally, you could retrieve it with the following command:
kubectl get secrets/keycloak-initial-admin -n keycloak --template='{{.data.password | base64decode}}'
# Copy the result (omit the % symbol at the end, if your terminal includes it)
- Create
omni-helm-values.yamlfile and update desired configuration
NOTE: Paste the Keycloak Password into the api > keycloak > password section in the YAML file.
timezone: UTC
image:
  tag: 'release' # <--- RECOMMENDED: UPDATE TO SPECIFIC TAG
host: YOUR_ROOT_DOMAIN.com # <--- UPDATE (ex: my-domain.com)
kyma:
  gateway:
    enabled: true
app:
  replicaCount: 3
api:
  replicaCount: 3
  db:
    type: postgres
    host: postgres-rw.omni.svc
    database: omni
    username: omni
    usernameSecretName: postgres-app
    passwordSecretName: postgres-app
  keycloak:
    username: admin
    password: KEYCLOAK_PASSWORD # <--- REPLACE WITH COPIED KEYCLOAK PASSWORD
docs:
  replicaCount: 2
- Deploy via HELM install command
helm install omni oci://registry.rizing.cloud/library/omni -n omni --version 1.0.0 -f omni-helm-values.yaml
Congratulations! Omni is now deployed to SAP's BTP Kyma environment. You can now run the application from the omni subdomain of the Kyma environment's domain (as set in the omni-helm-values.yaml file).
Example: https://omni.c-2d7e2a3.kyma.ondemand.com
Upgrades
- Use the same
omni-helm-values.yamlused for the initial deployment - Upgrade the
omni-helm-values.yamlfile with any desired additional configuration changes - Perform a HELM upgrade
helm upgrade --install omni oci://registry.rizing.cloud/library/omni -n omni --version 1.0.0 -f omni-helm-values.yaml
Uninstall
To uninstall all Omni workloads (including dependencies), delete the keycloak and omni namespaces.
NOTE: This will permanently delete all application data. Make sure you know what you are doing.
kubectl delete namespace keycloak
kubectl delete namespace omni
Troubleshooting
Symptom
omni-api-* pods have a "FAILED" status or restart count is greater than 0.
Diagnostics
This is typically caused by a misconfiguration of the Keycloak admin account details within omni-helm-values.yaml. The Omni API pods need to have the proper Keycloak admin account configured because these pods will communicate with the Keycloak API on startup in order to setup the necessary artifacts within Keycloak to support Omni.
The omni-api logs can be viewed to confirm that the Keycloak communication is broken with the following command:
kubectl logs -f deployment/omni-api -n omni
Adding a -f argument will follow the logs (docs).
Resolution
- Delete the
omninamespace (kubectl delete namespace omni) - Ensure the Keycloak admin account (username & password) are correct and properly added to
omni-helm-values.yaml- Try logging into the Keycloak admin dashboard with the configured admin account credentials to verify them
- Example:
https://identity.c-2977a50.kyma.ondemand.com
- Recreate the Omni namespace and artifacts by following the Install Omni steps again